The first part of Christmas is over, and I've some more time to work on my special technique for windows - it's a kind of bead weaving, like the technique used for jewellery making - only instead of pulling the warp threads up to make an item, I'm stitching them into my felt frame to make a permanently strung loom. It's backed up by being stitched to a frame made with some leftover card, just to ensure the threads are kept taut.
By spacing the warp threads at the correct width for the beads, then crossing them with a weft that is already strung, I can create a row of evenly placed beads. I then stitch through the felt, and keeping the needle the same height as the previous row, pass through the beads on the other side of the warps, keeping them held in position. This particular window has beads of two sizes, and was tricky to warp up evenly. Luckily, when I cover this piece with the outer fabric, I can have as many loose ends as I like!
It's a few days later, and here are some views of my buildings, set on their bases (which took a good while to dry together), filled in and with their windows cut. It's going just fine, but the curved part of the street, seen nearest in the photo above, bows upwards a little where the glue has dried. This was unfortunate, and a mistake I hope I won't be repeating - stacks of heavy books on everything for me!
Here's a preliminary shell of my composition, made in card. The base has yet to be made, of course, which will elevate the buildings, and give space for the road level and the riverbed. I feel I've lost a certain amount of realism, and that the layout isn't the most authentic - but for reasons of scale, and the view I hope you'll get of the dome, I'm only including the two buildings of similar heights - they should finish (excepting the spire) just below the curve at the top of the dome, with the spire finishing a few centimetres below the apex.
I've been gathering ideas and fabrics for my final project. I had a few ideas that I thought about taking forward for the end of the course, among them most notably was a plan to design a doll, and make her a set of clothes from clear vinyl, covering a wide range of fashion eras, and constructing the relevant undergarments (also from sheer/clear materials) in order to show how the fashions of the time changed the shape of the body, though the people themselves were essentially the same. I got up to the stage of wondering how to stuff her torso so that it could be cinched up or left free, when a thought struck me - this is a piece that should be personal, rather than something I think would be novel and therefore appeal to an audience. I should make something that I like, and that I would be pleased to have around and see often in the house. One category came to mind. If there's one major influence on my visual life, it is the Victorians. I thought to myself, they are people that loved to collect and to create 'things', which were often textiles. My favourite of their household items is the domed curiosity. In the field of textiles, these were most often silk flowers, or objects made from wound yarns. A prime example of a flower dome may be seen here:
As this trend developed, a popular commercial arm was in domed automata. This example was the one that really inspired me, though it's only a picture, and sadly, I can't see it in action. Apparently, the sea is only painted tissue paper! When I wanted to design a dome of interesting fabric objects, I thought immediately of one of my sketchbooks, where I took time in doing a little self-devised exercise to work out methods of manufacture for architectural details. As I often work on my projects over a long period of time, adopting a somewhat autonomous approach (I often have long periods of time where I feel very low, and the standard of my work suffers, so I tend to try and work as much as I can when I feel well), this was a very ambitious project to decide on - however, I want to try my best to bring in many of techniques I have learned/practised during the course, and think about the ways they will come in useful here. I'm effectively setting myself a puzzle with it, to ensure I remember as much as possible from the course term.
This dome features a very unusual approach to it's little landscape. Rather than being a rocky formation, a hill, etc, a piece of painted card has been inserted to form a background, and allows a bay to be shown. It also gives me an opportunity. I could take this piece as a starting point to design my own dome. Hopefully I can make a fully 3D object, and have a fabric painted background as a feature. However, if this is not possible, either for reasons of technique or time, an opaque backing presents another opportunity to prettily frame a smaller piece.
I have already begun to design the piece on paper, and to gather materials for it. The rough design so far is going to be based on my memories of a family trip to Bruges, and on my impressions of the beautifully stepped and tiled buildings there. My enduring impression of the city was of it's churches, and luckily my sketchbook features a good few techniques applicable to such a building. I'm also fortunate in that the textiles approach means a certain degree of irregularity - seam bumps, knot lumps, the occasional loose bobbin thread - and all these features apply both to the homemade domes of my initial inspiration and the worn nature of old buildings. This realisation is why I've decided to go ahead with my very large scale (thus far, it has all been mapped out on A2 paper) design.
Here are a few of the items I hope will come in useful for the piece. Some fabrics are plain enough to be ordered by the metre, but I'm doing my best to find more interesting fabrics in old clothing in charity shops, clearance sales, etc, in order to recycle them.
A few examples of my charity shop finds so far. Top left, you'll see a sheer dress with multicoloured palm leaves printed on it - I'm hoping to use this for foliage, or a riverbed, if I can work out a technique to create some water - my initial thought for model making was to use resin, though I fear this would make the piece very heavy indeed. Bottom row, from left: a sheer powder blue top, that I hope can be used to create a mist around the base of the dome, or in the painted background; a skirt with irregular metallic patches - good for making a cobbled road look wet with rain, I hope; a leopard print dress that I hope I can machine embroider to imitate the colours of a worn brick/stone wall; and a skirt with a wide, multicoloured weave that brilliantly reproduces a fine brick wall, albeit cut on the bias, which may cause some problems.
A few of the notions I've also purchased include a large bag of 3mm seed beads, which I hope to use a very special technique on to make some stained glass windows for my church; some green crochet cotton (and matching eyelash/fur effect yarn, not shown here) which I hope to use on the green Aida to make some realistic grass for the church's grave/courtyard, using the soumac weaving I learnt about last section. I also bought some novelty beads - iridescent bugles for small fish in the river, or maybe leadwork for the windows, some silver charm bracelet beads in the form of fish, also for the possible river, and some leaves/acorns to fall in the grass or water. My first challenge, once my initial drawings are done, will be to find a way to create a tough, firm skeleton, so that I can cut my fabrics to fit it - one way would be to use buckram and wire, of course, and keep the whole structure fabric, but I would like to think I could make something a little more hard-wearing.
Over the past few months, I’ve been asking myself some
pretty tough questions. I’ve mostly been using my study time to investigate
myself and my goals, and to find out what it is I really want. I’ve carried on
costuming and I’ve been coming up with lots of ideas both for clothing and for
large scale textile art pieces.
In the meantime, I’ve found myself unable to sign off on my
assignment, as I am dissatisfied with the results of the last section. I get
very anxious, and things lose their sense of proportion. So I’ve decided to
admit some ugly truths about myself. I find almost all aspects of textiles
interesting, but I try to persuade myself that I don’t, because somewhere in
the back of my mind, I hate that I’m not challenging gender stereotypes by doing
so. I love costume, but because of the mainstream interpretation of fashion, I
don’t want to admit I do for fear of being labelled shallow. But I love the way
you can modify it to give other people messages. It says a lot about you, and I like to switch between different perceptions, and sometimes
I encourage some of them – especially people who obviously belong to some kinds
of musical group (not the bands themselves, but the fans who recognisably belong to a single genre). There’s a sense of camaraderie that is very enjoyable.
In particular, I love the idea behind the concept of 'metalheads', and the way that they build up a shield around themselves. Instead of hiding their faces, they create such an atmosphere of unapproachability that people are sometimes scornful, sometimes frightened. But it's a psychological barrier, rather than a physical one. Though a lot of the genre's outfits include large metal components, for the most part, it's what is printed on the shirts, how many pounds of chains can you clip to your belt, how much eyeliner can you really apply - that's what makes people hesitant. It's a little like the pen being mightier than the sword! Strangely, on a first impression, or a glance, I find myself more drawn to people the more extreme they look - whether it's something about them as a person (like tattoos or piercings), or something they can apply, add to and change (like their clothing style).
I love people who really take it to the next level, like
body modifications or built in height. In many ways I’m more impressed with the
efforts of the cosplayers than the movie industry’s costumiers and special
effects makeup artists. The professionals have more of a budget, help from green
screens, lighting, and if it’s a really intricate costume it’s unlikely to get
involved in too much action – if it did, it’d be more likely to be CGI! So it
might actually be less durable than a costume a fan would make to walk around for days at an event – I've heard that sometimes, in film, multiple versions of a costume are
made in case of accidents.
One of the things that cosplayers seem to be very good at,
and one of the most interesting build features I’ve seen, are the amazing
four-point stilts. This extra pair of stilts – often made from crutches –
extend from the arms, and give you an amazing array of fantasy creatures to
imitate.
It’s probably my longest-enduring interest – people being
hidden behind a costume. Once upon a time, I made whole books full of
mysterious shapes that people could conceivably hide inside. It’s the introvert
in me that wants to go out and explore, and be around people, but never to be
surprised by spontaneous conversation that I might not be able to handle!
Contrast that with how incredibly attention-grabbing actually doing that would
be, even if it was clear (as hopefully it always would be) that it was a
costume made for fun, and with no actual intention of hiding the face of a
wrong-doer. You’d have to be an excellent actor to react to people through the
costume, as the video shows. As I get older, I am a little less afraid of
meeting new people, and I begin to feel more positively about the consequences
of getting the attention of a crowd. It’s still not the best way to feel about
yourself, to go from one extreme to the other, but it’s an improvement over how
it was before! Being more eager to show other people your work is strange. It makes you speed up your life – suddenly,
you want to know everything, and you’re convinced that if you try hard enough
you will succeed. But it also makes you arrogant, and if you can’t see the immediate
reward in something, you’ll put off doing it.
Finding a good compromise in working method is difficult - it's notoriously difficult. I've found that the best way to keep coming up with ideas is convincing yourself that you want to be as good as *insert name here* - let me explain. You might well think - as, when I'm in a gloomy mood, I do myself - that in order to come up with ideas for textiles, you must look at other textiles. But I've found that to be untrue. What's always stunned me about textiles is the range of techniques and their uses. Why wouldn't they be useful? They're good for so many more practical applications because they are flexible, easy to combine with other materials, and come in many different strengths, shapes and sizes. Throughout their history, I think they've diversified more than any other tool. And I've found that this realisation is more important as a first step towards a design approach than almost anything you could learn about yourself. Because it unlocks two more tools - important and lifelong tools. The first, that looking at any art field, any design, any object, any day or person could mean inspiration for your own field; it's so vast, and has so much innovation yet to be discovered. Anything, or parts of anything, could hold the key to an idea, fully formed in your practical mind, because you understand what can be done. The second, that by comparing yourself to that *insert name here* figure, no matter what it was they did, you keep yourself excited and interested in your subject, as you aspire to success on a level with theirs. It doesn't matter that their work doesn't teach you a practical tip, or it is as far from your work as anything could be. In fact, it might be better if it is - constant comparison over a sustained period, especially to someone else's work that you pretty much want to copy leads to very low self-esteem. It's best to do it in bursts, when you're feeling content, but not creative enough. They seem like simple things - and you've probably heard people say them to motivate you many times - but here's something else that's true and oft repeated: you don't learn it unless it's by experiencing it yourself. Therefore, when I'm feeling confused about direction, I just look up something interesting on a whim. For instance...
Another field of textiles/costume that inspired me to think
about making some of the odd costumes I’d been drawing for years was the ‘folk
costume'. Reading into these and collecting a long board of ‘pins’ featuring
them from all around the world made me realise that they are actually quite
common! My only trouble with them is that at no time do they look organic. They
are made as costumes, they’re not ashamed to admit it, and if that’s what
you’re going for as a designer, great. But if you want to be seen as a spirit
of the forest, you shouldn’t first be seen as a man in a costume. Some of the
best examples of these are Bulgarian Kukeri, as seen here.
Many of the European
folk costumes that are as extreme as this feature these thick coats of fur,
almost entirely hiding the outline of the body. The only problem being that in
order for them to play music, their hands must be uncovered, which is quite a
shame. It all comes back to being unseen - wanting to be so. It's been a constant theme through my life, and the reason I originally began in costume. It's so contradictory: hiding behind a mask will always attract more attention than a confident face.
I think that's why the other side of my personality wants to stay inside, and
work on complex projects inspired by past works of art. It tells me that the
idea of ‘wearable art’ is a nonsense, and to use and hone skills in static
pieces is the way to earn respect, and is a much more enduring pursuit, one
that you will be able to work on long after the novelty of meeting people
dressed in a creative way has worn off. It feels like the sensible option of
the two, and I certainly like the imagined creations of both fields equally. It’s
a difficult choice to make, and unfortunately I’m very much a person that has
to focus on one thing at a time. The textile art field still speaks to me as a
place with no limits – that’s very appealing indeed. I don’t think I would be
very good at tailoring my rather headstrong ways into something marketable. So
perhaps rather than trying to change people into creatures, it would be better
to make creatures of my own. I looked into the sculptural side of textiles
whilst thinking about writing this piece, and came across two interesting
studies; one of which makes figurative pieces, and the other makes, well,
creatures.
I was interested primarily in the techniques of Lisa Lichtenfels, not
least because she has apparently released a few books on the subject.
She works, as she kindly explained on her website, with batting around
wire skeletons (her work is almost solely figures), which are then
wrapped in stretchy nylon, sometimes several layers thick, so create a
realistic skin tone. Then the figure is further shaped with needle and
thread. Some of her figures are life-size, and all of them are certainly
interesting character studies in their own right. It's an unusual
medium, and her creations are obviously well-executed. At first, on
discovering this artist, I was a little disappointed that someone had
obviously cornered a market in interesting, figurative textile art. But
as I looked through her work, I changed my mind a little. Her figures,
though well-made and full of character, were all a little sleazy. I
could respect them as good objects, but I couldn't find them beautiful.
So I took heart, and looked into the second sculptor.
Alaskan Textile artist Lee Cross makes similar pieces in the animal kingdom, though over the poseable skeletons of plush toys. The main innovation is her use of paints to create eye-catching coats and pick out facial detail. Of course it helps that her photography is stunning, and that she has lovely scaled landscapes in which to pose her creations. It looks as though they are in great demand, too. Her work appears to be split into two main categories - those creatures that mimic wolves, deer, etc., and those that are closer to bushbabies or dormice. These latter are much more cartoonish, and again, they have a charm of their own, one which might well make up for the slight drop in realism between the series. If I was to have a complaint about them, it's that for fantasy creatures (and bearing in mind, these are calculated to be both easily poseable and cute enough to be marketable) they are quite 'safe' designs. Both of these artists have techniques to learn from, points where they are off-puttingly skilled, and points where they are challengingly looking for someone to add to them. I hope they wouldn't mind me saying this, and that they would encourage me to add my own values and visions to the work they've started. Because I still feel that textiles as a art is in it's infancy, and that's why for the moment, there isn't half of the diversity that the medium is capable of.
As I'm sure I've made clear above, my primary interest at the moment is split between textiles and sculpture. I find it very interesting when one method is combined with another - textiles and sculpture being only one example. It's right that it should be especially interesting, because the artist in question has to have observed both of their subjects before embarking on their piece. Take this example, one of my favourites; a fifteenth century carving of a bishop. When you see the whole figure, you're able to observe his mitre, cope, robes, and in particular the embroidery-imitating orphrey, which is amazing. As you can see in this close up on the mitre, the sculptor has done his best to convey an embroidered scene (almost certainly the annunciation), complete with varied raised stitch-work and seed pearls. What I find so intriguing is that even for a sculptor, the possibilities of textiles used in 3D were irresistible. It's true that they have intricate and tiny textures of their own that have wide appeal, and the two worlds met well here.
Figure of St Wolfgang, from the high altar of (the town of) St Wolfgang. Salzkammergut, Austria, carved and painted by Michael Pacher, completed 1481.
When I was painting, I was particularly proud of one picture. It was 3D, built up on kitchen roll, and over-painted many times in black, then with some background in white. I took a cake icing nozzle and carefully traced over the thin grey lines in white acrylic paint. I tried my best to fit the pattern around the folds in the 'fabric'. I was so pleased with this picture - I enjoyed people's reactions, too. They were particularly impressed that I had bridged a gap between two art worlds. And I think that for my final project, that's what I want to do again. It's been done before, of course, and in more subtle ways than you'd realise. Again, sculpture led the way.
One of my own old paintings of a piece of lace.
Recently, I saw that many of the Spanish and Italian sculptures of the 17th century that I admire so much (they're romantic, terrifying at points, but always amazingly realistic, and nearly always life size) actually have clothing made of real, plain cloth, and stiffened by many layers of glue, then painted. I found this a very inspiring discovery, and again, began to think about textiles in a more sculptural way. One example of a statue that was made with finely carved wood only was this bust of the Virgin Mary, one of the first sculptures in this style that I knew of. I assumed that all the figures were made this way, in many many carved layers. Her veil, seen in this close-up, is wood carved out to about... 5mm thick?
Mater Dolorosa, by Pedro de Mena, 1670s.
As far as I can remember, I saw her as part of a touring exhibition a good few years ago. Reading a review of this exhibition's American leg, which seems to have featured more items than the London edition, I came across this sculpture, which I hadn't seen before. In the actual description in the article (see caption) they mention the drapery being glue-soaked fabric. It's interesting to imagine the application of the fabric to the piece. Was it painted beforehand, so as to create a more believable transition between fabric and 'skin'? I think it probably was. So it must have been very tricky, applying the wet fabric in folds around the statue, and trying to keep the glue away from the paint. Perhaps they were varnished in a single layer after the clothing was applied, to cover up any traces of drying glue drips.
From the LA Times: "The artist of this sculpture, circa 1680-1700, is unknown. Polychromed plaster, macerated
linen fibres, gesso- or glue-soaked fabric, wood, papier-maché, glass
and other materials."
The first statue that I came across that used this technique was this one, from the Met. I couldn't believe how beautiful the folds of fabric were, and began to find them a little suspicious - though of course I still hoped they were carved somehow! The description of the materials involved reads thus: "Polychromed terracotta head; wooden limbs and wings; body of wire wrapped in tow; various fabrics" - looking up 'tow' online, it apparently means either
1: short or broken fibre (as of flax, hemp, or synthetic material) that is used especially for yarn, twine, or stuffing
2: yarn or cloth made of tow
So in the form you might find for wrapping wire, perhaps it resembles batting?
It's a lovely statue, and the movement in the fabric is the best part! I'd love to do a project that explores the ways that fabric can be used in tandem with glue to create something like this. Hopefully I'll have enough time to do so. I think in summary, what I've learnt from my notes so far, leading up to my final project, is that I like to have a goal in mind - like the folds of this fabric - something to mimic, even if it's an imagined scene or texture, and then work out how to get to it. I think that's when I work best. By innovating, and finding ways to overcome technical issues.
Figure of an Angel, artist unknown, but attributed to Giuseppe Gori, 1750-1800. Property of the Met, NY.
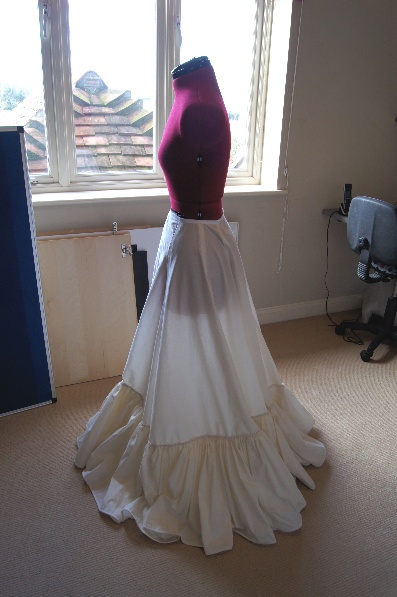
Finally, a couple of pictures of extra things I've been up to at the end of this section. As I said, I've been costuming again, and one of the things I've made is a set of Victorian (1890s) style petticoats. Here is the top layer, with a cream base and white ruffle - I thought it made sense to have a lovely white glimpse at the hem of a darker dress, and to keep the fabric that is close to the body a less easily discoloured fabric.
Another shot, this one of the layer underneath - this picture shows how sheer the fabric is. A narrower ruffle is featured, but one that is gathered more. On both petticoats, I stitched a wide seam almost the whole length of the ruffle, then inserted a yarn needle attached to a ball of string. I carefully divided the length of the ruffle and the position on the skirt of it's top edge, and gathered accordingly, pinning as I went. At the ruffle's hem, I left the string at full length, to add stiffness. I also, as advised in my Victorian dressmaker's guides, turned up the hem of the petticoat base and sewed a 2" band of thicker fabric around the edge, to help it keep it's shape. This time, because my fabric was quite fine, I used calico. Apparently, for a tough tweed walking skirt or the like, they might once have used anything up to canvas!
I've also been keeping 3 books - 2 that are part of my learning log, showing want I've been looking at and researching lately, and 1 a diary/directory of fabrics I've put into my collection, with notes on possible uses/observations.
I also lined my cape from earlier in this section, using some silky bedsheets bought in a charity shop. The extra weight gives it a beautiful 'hang', but it needs a solid clasp at the neck to keep it on the shoulders. We'll see how that design works out.
Lastly, I've been all round collecting materials for my final piece. Here are some of the ingredients collected so far - unfortunately the pictures didn't bring out my schematic drawings, which must have been too faint. More on them later, though.
Some of the smaller ingredients - the success of these components very much depends on my technical ability with another medium - casting resin. More on this later.
To summarise. During this assignment, I've had a few changes in my life, and suffered rather a lot from a loss of creative vision. However, if I hadn't taken a little time forcing some parts of the section, I wouldn't have gotten to the end, and discovered a new goal to aim for. It's actually becoming quite hopeful. I feel pleased in all aspects with it's potential. My only fear is that I might not have enough time to finish what I've begun, now that I've started to believe in my abilities again. I've been looking at plenty of inspirational artists during this section, and I've seen a lot of great work. And they tell me that the only thing I can do is to try.
Something I've been working on for a long time - I showed earlier stages of construction on this very blog - is nearing completion. I was so invigorated by my efforts with the jacket a couple of posts back, that I found myself going out and buying some very expensive fur fabric to finish the edge of this cape. As you can see, it's also got an insert to shape the shoulders and neck - the few days of draping classes I did were invaluable for working out the pattern pieces for this. Around the top is a knitted ruffle to soften the transition from the plain knitted edge to the solid colour fabric. This was plenty of fun to make, and very simple - I knitted two, and knitted them together on almost the last row. I made a little too much, and ruffled it up more than I had expected! The next thing on my list is to use a nice satin bedspread I found in a charity shop and make the lining - I expect I'll do it the same way as cutting the velveteen - two large semi-circles. And, of course, my custom made pattern pieces for the neck!
My final sampler for this section, the word-association piece. For this piece, I chose a word I knew I'd be able to get plenty of wide-ranging imagery/topics for - the word 'precious'. As you can see here, I've got 5 sections, in which I've taken very different approaches. Here they are step by step. The first section (seen the right way up) is in gold and red crochet cotton / thread yarns. My idea for this one was to have an obviously regular pattern and to hold myself to it, making sure I kept the number of threads and their tension the same on both sides. I thought this would be good practice for keeping the other sections in check. However, by pulling up the sides until they were very taut indeed, the warp threads began to pull in on one side, and white yarn began to appear. Again, I used the fork to try and rescue the situation, but keeping the tension right whilst using such a slippery metallic thread was more of a challenge than I thought. Filling in the centre and 'locking' the side threads meant that it became a little more regular again, though thinking about my initial source for this section - that of Anglo-Saxon garnet jewellery - it felt like it wasn't enough, and I was ashamed of my effort. I soumak'd/over-stitched the red section in more of the gold thread, and felt a little better - the centre WAS regular. The sides were a let-down. The important thing about hand-weaving, I realise now, is not to have every thread pulled to breaking point, but to make sure they lie nicely over the top of the warps. Beating them down is the important part, the part that requires the most force, not tugging on the thread itself. Luckily, the next section made a pleasant break.
The inspiration for this section was, of course, Ermine fur. A very simple weave of white fur effect or 'eyelash' yarn, punctuated by black tufts of the same, applied in the Ghiordes technique. The only extra technique I needed to use for this section was plucking all the white fur to the front of the loom with a yarn needle.
The third section is very frustrating. The original idea - needlewoven borders surrounding a lovely lace square - came out beautifully. The irregular and elongated shape now visible was due to my own short-sightedness. I completed the sides, as well as a few rows at the top and bottom across the width of the warp, and in my excitement, decided to cut those warps, stitch them back as hems, and make the lace. Then, when the next section was to be worked, and the warps had seriously relaxed, I added wooden rods at the top of the loom to straighten them. The correct tension for weaving couldn't be reached without pulling the semi-stretchy lace to it's limit. Hence, this section and the next cannot be neatened further without being sewn down to a backing. A good idea gone astray for lack of foresight.
The fourth section was inspired by the worth placed on leaded glass in the past. I'd heard about bead weaving before, and thought it would make an interesting addition to the sampler. I got hold of some clear glass beads, and made frames for them with further needle-weaving, counting the turns in each black block as I went along. Then, as it was an asymmetrical pattern, I worked out what fraction of each diamond was seen on the edges, and made sure to keep the rows of beads regular as I went along, 'fading' them out to leave two warp threads as edging.
For the last section, I thought it would be good to attempt (now that I'd hopefully honed my skills a bit) to make something which would have been considered a valuable piece of weaving itself. I wanted it to resemble renaissance Italian velvet. Nothing like being ambitious! Again, the gold thread was very slippery, and any attempt to tighten it made white threads appear prominently. I was especially disappointed with this one - the by now extremely uneven tension of the warps made this part very difficult. It just goes to show - the oldest, most basic of techniques, and it still requires practice and know-how. But the ghiordes knot pile actually came out beautifully, hiding the rough edges and making a nice, soft surface. In my photo, which highlights the white, it actually looks worse than it is.
I wanted to end the folder-set part of this section on a high note, but I actually found myself admitting that I am a beginner at this method, and it shows. Perhaps that's important to note, though - it's all a learning experience, and maybe 'the worst' is over.
I had a crazy idea recently. Despite being a vegan, I've always had a love for the look of leather clothing - I just couldn't buy or wear the real stuff myself. As previously discussed, I also love all things Victorian, particularly the clothing (and within that, particularly the puffy sleeves of the 1890s). So when I decided life was too short not to have a crazy leather-ish jacket, I went out and bought some of the plastic imitation stuff, and set to work on an 1894 fashion plate. What follows is the result.
Having never made a jacket before, and having only limited experience of adapting old patterns, I'm very pleased with how this turned out. Ludicrous, probably. But a great deal of fun. The best part was edge-stitching the collar, and turning it the right way out to make sure it laid flat. It did, and the collar's roll line, which was the part that needed the most modification from the original, sat perfectly.
Being very thick fabric, it was difficult to hand-stitch anywhere, which made for some very creative machine work, especially when the shoulder pleating was pinned into place. Naturally, it being a leather jacket, I needed to add some studs, and several rows of alternating 10 and 15mm spikes did the job nicely, their backs being covered by a wide cuff lining. It remains unlined, albeit with a large hem turn up and reverse panels up to the dart of the jacket front, also in the black faux leather. As yet I need to make a finished belt for it from my leftover fabric, and add belt loops. But it's great to know that my crazy jacket modification will fit, and despite it's weight, be wearable without slipping off the shoulders!
Completing this project, silly as it is, has helped to reinvigorate my enthusiasm for all things costume. If I can somehow bring together costuming and textile art, I think I might have a pretty good final project on my hands.
For this exercise, I was asked to choose a sketch, image, or idea, and develop it into a piece of woven cloth. Thus far, in this section, this was my second favourite thing to do, after the lace squares. I had seen a tutorial a while ago online for circular weaving, and without more than a few seconds thought, decided to do this. The idea is a kind of rose window - I was originally going to weave quite a simple shape, and then embroider (in a soumak style) some black wool 'lead' over the top, possibly in the traditional diamond shape. However, I felt that (as usual) this would give me too much of a certain framework, and I would become frustrated at not being able to make all 6 sections match exactly, when I was supposed to be experimental and spontaneous. There was also the trouble of the shape itself - obviously, all warp strands cross in the centre of the board, and are therefore very closely grouped in the centre, tapering off towards the edges, and spacing out. I soon realised that if I was to embroider over these unevenly spaced threads, the shape would be likely to pucker up. So I went out shopping, and found a crochet cotton weight yarn, roughly the same as the black edging. It had a nice colour change in it, and I thought it would be fine to replicate stained glass, as seen from a distance. I was pleased with this project - I felt quite fulfilled. I think that's because it looked like a finished product, rather than a sample, though of course, that's what it was. One problem that became apparent once I cut it from the 'loom', though, was that it almost immediately lost it's shape - this was due to the threads being so loosely packed at the edges of the board. It might be a good idea to insert some small "v" shaped warps in at some point, anchoring them around one or two of the weft threads in previous rows. A future experiment, perhaps.
I've been writing, recently, in one of my research/inspiration books, about the strange appeal of metallic elements in clothing. It's certainly something that appeals to me, anyway - and for this exercise about using unusual materials I thought I'd go all out. It was important to use a very rigid structure as a warp, and - for fear of it sliding out - decided to make a frame for it that wouldn't have to be removed, in much the same way as I did for the lace sampler project a few posts back. This time I used some quite thick wooden dowels. I began by weaving with thick wire used for gardening, then built up with some jewellery chains from eBay, some metallic yarn, and strings of beads or buttons.
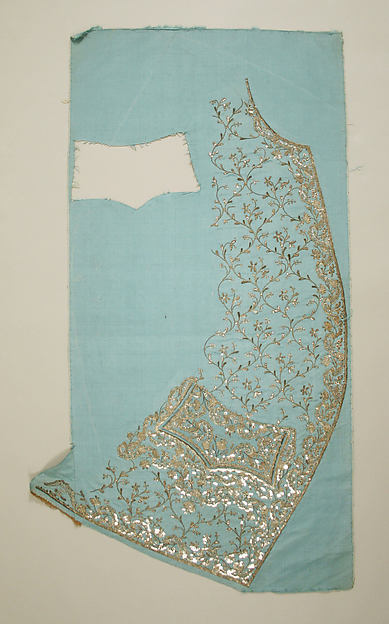
My idea for this was partially with the final project in mind - I wondered whether it would be possible to make a 'suit of armour' that, with the right wire/chain/metal to thread ratio could be semi-viable as an actual suit! I had a vision in my head of being able to weave panels of the right shape, then remove the wooden frame, and 'sew' the panels together with wire. I imagined I could lay them out as a finished shape, embellish, and lift. This thought was inspired by a piece of cloth from the Metropolitan museum of Art, NY. Here's a picture:
I've seen a few historical documents that show this was the way such jackets were constructed, and I must say that from the little experience of embroidery I've had, having a well-stretched surface to stitch has been a vital element. It makes sense to keep it a regular shape for as long as possible.
It's been an interesting project, if one that's very hard on the hands. I've not been entirely won over to the idea of working intuitively yet, but it's true that until you do something, you are never sure what you will learn. Being given more ideas for the final project is always a good thing, too.
This section of the folder has asked me to try a more experimental, freer way of weaving, and though I am usually quite an inhibited person, who likes to plan things out in advance (and am often too eager to cling to rules and restrictions), I've given it a try. I thought a good way to pick my materials was to begin with a nice warp - this one is a thick yarn with metallic elements, and a colour progression from blue-purple to turquoise. Then I would loosely theme my different weft materials into see through, metallic or sheer. I've got quite a selection - from the left, we've got tin foil, folded into weaveable strips, wire, PVC strands of 'scoubidou', bubblewrap, clingfilm, strips of a plastic tablecloth, and some twisted clingfilm in more complicated stitches, as it worked the best! As I was working this sampler, I had a good idea for a larger one - see my next post for more details.
Just a few notes on the samplers that tested different weaving techniques - the only background I have for this is when I was trying out the instructions for making a loom and used a large tapestry embroidery frame to attach the warp threads - sewing each loop of navy wool to the twill tape nailed to either end of the frame. I then took a piece of bamboo cane and made a continous string heddle (credit for the tutorial goes here) for it - as well as a reinforced cardboard shed stick and shuttle, which I covered with clingfilm to reduce the friction (it increased the static electricity though!). This made it easy work, though the fibres occasionally felted together with those of the heddle - if I tried this full weaving method again I'd use a tightly woven cord, perhaps the kind you can find in Roman blinds. Once I'd finished, I was quite happy with the product - but holding it up, realised that it was really quite see-through. In some places the tension was a little uneven, too. So I put it away for a bit, and worried about it. Looking through the folder's instructions, I saw that the way forward was to tighten the whole thing using the suggested fork method. I thought that I had been really very thorough with my (again) cardboard beater, but this worked like a dream. As it was only a trial - and one where the shuttle had run out about halfway through, I decided I would move either side of the shuttle join back out towards the edges of the loom. With a large gap of warp threads exposed in the centre, I thought I would take the opportunity to try a little needleweaving - the only trouble this caused in the end was not showing up on camera!
The second sampler I tried out my makeshift loom on, I made a little easier for myself. I made it much narrower, and stuck to the brief - just a few repeats of each technique until I felt confident I could remember and untilise them. Currently, the biggest problem I have in terms of finish is that I somehow never manage to make the warp threads tight enough, and they bow inwards. However, as an experiment, I think this one went very well indeed. I learnt a good few techniques in a short space of time, and without a large outlay of resources. Roll on the next exercise!
This is the result of me wishing to recreate a sampler I made a few years ago, in which I tried out the many different recommended stitches in a lovely book, the Encyclopedia of Needlework by Th. de Dillmont, of which I have an old copy. Wishing to make the original in the correct way, I put together several layers of felt, and stitched over the top of them a sheet of paper with the grid marked out on it, and then outlined it with some medium-thickness crochet cotton. However, I failed to secure the outlining thread with enough stitches, and as a result, as I filled in the squares with the needlelace stitches, the frame buckled, and warped until there was no tension left. Being very disappointed at wasting so much time, I left the project alone for more than a year. Reading the brief for this exercise, though, and being interested in the idea of combining weaving and lace - possibly without having to cut the threads of both directions, and weaving more organically shaped windows in the cloth, I decided to resurrect the sampler. Used in real cloth, rather than a frame, I think it would be a little like this one, though I'm pretty certain this used cutwork:
Therefore I felt justified in using needlelace - which, quite often, with the needle passing up and down regularly through the fabric - is very similar to needleweaving itself. There are 36 samples of needlelace involved, as well as some experiments with different thread weights at the top and bottom of the frame. The frame itself is made of a pictureframe with wooden skewers glued across. They are not entirely even, and I may well trim their sharp ends! Without listing the stitch used in every part - as they are often given numbers, rather than names, in her book, I found out many interesting things about my favourite subject, lace. I found out that the tougher your border, the better your lacework. In fact, the lace itself is quite tightly pulled up, especially the closely packed stitches made to resemble cloth - I packed them a little too closely myself, and they are slightly popping out the frame. I learned that the fine threads seen in museum examples are both tinier than you would imagine and puzzlingly, a little more possible than you'd think - as long as the needle you're using doesn't have an end sharp enough to damage the threads. I also learned that the amount of concentration needed was high and it was constant. Like painting, there isn't a part of it you can do on autopilot, as the tension of each stitch - and the impact of the current stitch on the last - must always be judged by eye. My only regret regarding this exercise is that I didn't use the experimental materials that I had collected. On the one hand, I feel that I might be missing out on an important learning experience by not trying out the possibilities listed in the folder. On the other, I realise it's quite subjective; it is open - very open - to personal expression and experimentation. And after all, the textiles fields are all very closely linked, and combine so happily.
In this bundle of exercises, I found a surprisingly relaxing experience. I liked all aspects - matching the colours of my thread collection to my chosen image (which I think came out quite well), weaving little strips out of paper, and going back to a craze from my early teens involving many, many plastic cords. At the time, I remember it having many different names, but the one that stuck with me was 'Scoubidou', which I understand was it's original French name. I was pleasantly surprised by how easily it came back to me, though I wanted to include more strands - Googling about, I came across this page: Palma and Margarita braids each of which use an amazing 24 strands. As a part of traditional south American weaving, these braids are apparently used to keep the frames taut. Making plenty of different braids was good fun, and looking into different weaving patterns to construct in paper was actually very educational. Looking at patterned cloth before, I wasn't sure how to count the threads, or to work out which ones rose and fell at which parts of the pattern. Although tapestry weaving, and how to create a smooth surface with so many overlapping colours still seems a long way off for me, I can understand some basic weaves much more easily, and recognise them on sight. I also imagine you could combine the two - braiding and weaving - to make some very tough, colourful cloth. Especially if you very the materials, and include, say, some of the PVC scoubidou threads, or some metallic effect yarn, maybe even some fine wire. I think, though, in that case it might be difficult to create something regular - unless you used a proper weaving frame, and wrapped your threads very tightly indeed around the wire when braiding to stop it from poking out at the end of a row. Then again, perhaps just wrapping wire to weave with would be an interesting experiment, as long as it stays in place.
As regards the colour matching exercise, I chose two images to attempt to match the colours from - one was The Ideal City (Urbino version), the famous 1470 painting of unknown authorship, the restricted colour palette of which would, I thought, encourage me to use the threads in a traditional way, trying my best to hide the shift between colours by blending them as subtly as possible. The second was Our English Coasts by Holman Hunt, the colours of which are some of the finest in painting - the red-brown clay soil, the tones of the sky meeting the sea, and my favourite part, the pink ears of the sheep with the sun behind. I thought it'd be good to keep them all together, and stuck them into my sketchbook, together with the little windings of thread, my coloured pencil blocks, and the labels for each part of the painting. It makes you realise both the limitations of the form and the doggedness of the weavers - a painter can mix two colours he has seamlessly together - and must do so often. A weaver needs a whole new tube of paint every time - combining strands of thread and continuing to weave won't give the right impression of blending up close.
The picture used above is one of my last experiments - trying to weave flat braids together into cloth. It was actually quite successful, but very time-consuming indeed. Picking a colour from each bunch of 8, when it reached the edge of another braid, I would swap the threads over, creating a join. This happened naturally fairly often, but if I were to do it again, I would make the joins twice as frequent, perhaps by colour-coding them along the width of the weave, just to save confusion.
So altogether, it's been a good refresher on some of the basics, and a good introduction to the mechanics of weaving.
I’ve been asked to look into the work of the textile artist,
and specifically, the categories that many people find themselves labelled
with. Here’s a table I’ve made with my initial thoughts on the categories set
by the folder.
Looking at the table, I feel that there are some areas of
ambiguity. Here are a couple of questions I’d like to be able to answer. These
might be good to build on for further essays.
A designer I’ve looked at previously on this blog is Alcide
Roussel, the Frenchman (?) who made the lace I visited at the V&A. Roussel
was a designer, and in his workshop were craftspeople. Were their products art?
Their inclusion in the V&A collection would suggest so. If this is
accepted, who is the artist? The owner of the concept, or the person that
creates the object?I would argue that
both are. Art is an inclusive family, or it should be. Anyone that can use
skills that they have worked hard at learning to create an object of beauty,
such as this lace, must surely be an artist.
The
second question I would ask is: is labelling useful? Take, for example, some
historical figures that are old enough to be indisputably called artists. Dürer is known firstly for his oil paintings,
then his prints. It’s likely that he designed the blocks, and handed the work over
to a professional carver to replicate his fine lines. So does this make him a
designer, too? He also probably made his own paints from pigments, and mixed
them himself, despite the size of his workshop. He worked in a traditional
form, on many religious subjects, as well as contemporary paintings. So was he
also a craftsperson? Working with tools partly of his own making, and learning
from a master of his trade, as well as in a manner established by long
tradition. Take just those factors, and surely he would be an artisan.
Moving
on to textile art, though, the folder asks me if I look at a piece of textile
art in the same way as a painting or sculpture. My answer to that would be – I
do, but I think that I’m in the minority. It’s got the wrong image – and I
think that’s to do with the history it’s missing. Or rather, not missing, but
overlooked. The history of many art forms – painting for example, have a long
and revered history – as far back as Egyptian tomb painting – or those
prehistoric depictions of hunts on cave walls. Or sculpture – back all the way
to ancient Greece – or further, to those early humanoid figures, like the Löwenmensch figurine. But textiles have far
less history left, due partly to its uses, partly to its very nature.
Sculpture, in early times, aside from flint knapping, was given significant
uses – lucky charms and early gods were made to last. Painting was used to tell
stories and to brighten the lives of the inhabitants of those caves. Therefore
it would be placed were they would be much of the time – in a sheltered
location. So both sculpture and painting survived. But textiles were much more
transitory, as they were almost always made with a practical view – as far as
we know, anyway. They probably had dyeing and decorative weaving, even if it
was just stripes in cloth. (link to 27,000 year old cloth) but the point is
that they would be constantly in motion. And wear out. And be used on the
floor, or thrown away, and rotted down, or maybe even burnt for kindling.
So we only have a cultural view of the work from
civilizations with writing systems. And although it is equally important as a craft
for a prosperous society, as an art, it was thought almost beneath
contempt.
For the most obvious theory as to why this is, we only have
to look at who made the work. Women – and most likely, wealthier women. But is
this why it’s still on its own in the art field? In cultures were artistic
textiles were traditionally made by men – in Japan, for example, whilst the
genders were as segregated as in any other nation, their clothing was less so,
and the craft was a respectable profession, recognised as demanding a great
deal of dedication and skill. Yes, women were still dressier, but a man wearing
an embroidered outfit, or a bright colour would only be thought of as an
important man, and not one that was in some way effeminate.
This is not to say that in European society up until 1800,
the upper-class man would not be pleased by an embroidered court suit. But the
workers who created such a suit would be subservient to the designer, and
unlikely to have been paid anything more than an hourly rate for a job well
done. It’s interesting that the religion of the 19th century is
still dictating a dress code for men today. Their policy of ‘stark and dark’
for much of men’s fashion is still adhered to. A man wearing a boldly printed
shirt wouldn’t arouse interest. But an embroidered jacket? Madness.
Embroidery and lace seem to have come off worst from this
change in fashion. It’s true that most people wouldn’t recognise the difference
between machine-made and handmade examples, and that therefore there is very
little trade to be had from making either in the old style – the prestige of
either as a display of wealth is gone. For some, the appeal of a well-tailored
suit remains, but the Georgian ideal of a brightly woven and glitteringly
embroidered one has vanished. Again, the Victorians are probably responsible.
Whereas a man was a tailor, a woman was a seamstress. And she did a lot of the
decoration. Embroidery would not only have been a ridiculous hobby for a
Victorian who couldn’t afford to be an eccentric lord, but in the later years
of the age, it might even have been regarded as suspiciously female.
It has the lazy connotations of a system many years old. It
sometimes applies, sometimes it doesn’t. A woman that cooks is a cook. A man
that cooks is a chef. A woman that designs fashions is a dressmaker. A man that
designs fashions is a couturier. A woman that embroiders is a hobbyist. A man
that does it – well, he might be an artist. But we still haven’t got there yet.
He’d probably just be ‘unusual’. It’s not fair on either. It’s an art-form. And
people that do it are artists. It has possibilities other spheres do not.
Therefore people that want to explore those spheres want to for their own sake.
It shouldn’t say anything about them as a person.
With that in mind, let’s look at two artists who have
crossed those boundaries. Firstly, Japanese artist Takahiro Iwasaki. As a multi-media artist, he doesn't work only in textiles - in fact, even in the article where I first discovered his work, his textile work took second billing to a model carved from electrical tape. His work seems to share a theme of intricacy throughout, though. It also demonstrates another quintessentially Japanese trait - that of taking any small twist on a concept and demonstrating it in an unbelievably elegant, understated way. The article where I first saw his work was a report on his exhibition, "out of disorder". Here's a link. It featured sculptures such as this:
This was the first piece I'd seen by him, and I was immediately taken by the scale. However, some of the other textile pieces displayed in the article show that scale more effectively:
I've been asked to talk about his work in terms of imagery, technique,
etc., but the truth is that it is quite difficult to find examples of
his work online. Therefore I will explore themes as best I can.
His work in this medium consists of a series of tiny thread sculptures, made (mostly) to match their colour with other objects, onto which they are attached. The sculptures are all of modernist buildings, mostly those made with many steel struts; pylons, observation towers, Ferris wheels. The objects are all textile pieces found around the home.
I think the effect that makes these so memorable for me is the idea of worlds running parallel to ours, especially in mysterious or hidden ways. Here, with the threads of household objects spinning their own tiny worlds, it's... well, enchanting. I think it's a similar kind of appeal to that of spy novels - the thrill of something unknown being so near to us, but unseen. In constrast, though, industrial landscapes are rarely thought of as something ambiguous. They imply decay, poisonous atmospheres and unforgiving, utilitarian design. They're harsh, verging on cruel. So the other advantage, it seems to me, of using this technique and scale is the way that it makes an effective commentary on the way people adapt to their surroundings. Other objects featured in the exhibition show towels and bedsheets as well as these toothbrushes, with added industrial features. Notice that these are all objects that come into contact with the skin of the owner, and that they are textiles, and therefore absorb and stain. So perhaps it implies that people in a city can't quite get the dirt of it off their skin in a day. As these are everyday objects, they are becoming clogged with the dust of the environment their owner brings through the door each night, and are starting to show their wear. Or maybe they're learning to adapt, and blend in.
Another of his works - not a textile piece, but one that does show beautifully the elegance I mentioned, is part of a series of wooden sculptures exploring reflections:
It's a good example of a concept - that of a sculpture that implies reflection without using mirrors or water - being used in a way that communicates only that idea, without fuss or distractions. It's interesting that he should have made a sculpture, architectural in form, that is suspended by fine wires in a gallery. Because that is precisely the theme of the next artist I want to talk about - Korean multimedia artist, Do-Ho Suh.
The theme of a few of his exhibitions has been transforming his sketches of objects and buildings into 3D, life-size fabric replicas. The first object I saw was this one, the oven from his Manhattan apartment. It's well worth zooming in on.
It's interesting in two ways - firstly, that the material used means that the interior of each object can be seen and inspected - it's almost 4D! Secondly that by changing the technique/material of an everyday object, it can be made interesting enough to be worthy of exhibition. It's a fascinating collection of objects, more of which can be seen here. It's also brilliant to be able to see how skillfully the nets to such complicated objects must have been cut. From a practical point of view, I'm glad that I am not making objects like these, where there is no 'wrong side' to hide knots, frayed edges, etc.
However, he didn't stop at the domestic scale, and expanded on this theme into lifesize silk replicas - of his previous homes. One inside the other. They look so much like CGI, it's quite difficult to believe.
Man viewing the exhibition up close.
I think that what I find most inspiring in a textile sense about these two artists is the way that their concepts are a shift from one medium to another - and they're relatively humble ideas, too. There are so many ways to embellish something with textiles - beading, embroidery, lacework, appliqué, probably dozens. They've taken objects of little interest, and by moving them into this field, and changing small things about them, they've made them something almost completely new. Yes, I think that's what I like most about textiles - that they always have an extra layer of technique to apply.
Note: like many contemporary artists - I'm sure both of the artists I'm talking about today are no exception - these two seem to come up with ideas in any medium, and probably find technicians to make the objects themselves. Certainly that is true of the house project pictured above - it's a lifetime of work otherwise! So it is a little difficult to find a textiles artist whose work is on a human scale (that is, all the components are handmade by the artist), but has the same impressive quality that a large project like the silk houses have. We must admit that the field of textiles is one in which time can really sink before any satisfactory results can emerge. It's the point of compromise for an art field in which there are so many possibilities and styles. However, it also means that - for a good deal of time - there are points where collaboration by a group of people is possible before the final assembly of a project. It would obviously have been better to more openly acknowledge this kind of work as a community project with Suh as the director/creator, but it is part of the routine now.