 |
| Source here. |
Thursday, 2 July 2015
Exercise 4 - Rigid Grid Weaving.
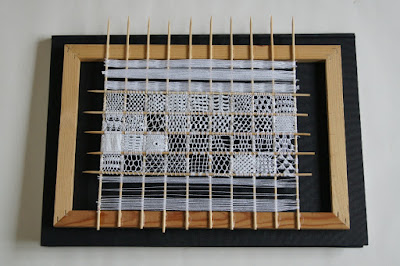
This is the result of me wishing to recreate a sampler I made a few years ago, in which I tried out the many different recommended stitches in a lovely book, the Encyclopedia of Needlework by Th. de Dillmont, of which I have an old copy. Wishing to make the original in the correct way, I put together several layers of felt, and stitched over the top of them a sheet of paper with the grid marked out on it, and then outlined it with some medium-thickness crochet cotton. However, I failed to secure the outlining thread with enough stitches, and as a result, as I filled in the squares with the needlelace stitches, the frame buckled, and warped until there was no tension left. Being very disappointed at wasting so much time, I left the project alone for more than a year. Reading the brief for this exercise, though, and being interested in the idea of combining weaving and lace - possibly without having to cut the threads of both directions, and weaving more organically shaped windows in the cloth, I decided to resurrect the sampler. Used in real cloth, rather than a frame, I think it would be a little like this one, though I'm pretty certain this used cutwork:
Therefore I felt justified in using needlelace - which, quite often, with the needle passing up and down regularly through the fabric - is very similar to needleweaving itself. There are 36 samples of needlelace involved, as well as some experiments with different thread weights at the top and bottom of the frame. The frame itself is made of a pictureframe with wooden skewers glued across. They are not entirely even, and I may well trim their sharp ends! Without listing the stitch used in every part - as they are often given numbers, rather than names, in her book, I found out many interesting things about my favourite subject, lace. I found out that the tougher your border, the better your lacework. In fact, the lace itself is quite tightly pulled up, especially the closely packed stitches made to resemble cloth - I packed them a little too closely myself, and they are slightly popping out the frame. I learned that the fine threads seen in museum examples are both tinier than you would imagine and puzzlingly, a little more possible than you'd think - as long as the needle you're using doesn't have an end sharp enough to damage the threads. I also learned that the amount of concentration needed was high and it was constant. Like painting, there isn't a part of it you can do on autopilot, as the tension of each stitch - and the impact of the current stitch on the last - must always be judged by eye. My only regret regarding this exercise is that I didn't use the experimental materials that I had collected. On the one hand, I feel that I might be missing out on an important learning experience by not trying out the possibilities listed in the folder. On the other, I realise it's quite subjective; it is open - very open - to personal expression and experimentation. And after all, the textiles fields are all very closely linked, and combine so happily.
Subscribe to:
Post Comments (Atom)

No comments:
Post a Comment