Friday 24 July 2015

Experimenting with Different Materials, Sampler 1


This section of the folder has asked me to try a more experimental, freer way of weaving, and though I am usually quite an inhibited person, who likes to plan things out in advance (and am often too eager to cling to rules and restrictions), I've given it a try. I thought a good way to pick my materials was to begin with a nice warp - this one is a thick yarn with metallic elements, and a colour progression from blue-purple to turquoise. Then I would loosely theme my different weft materials into see through, metallic or sheer. I've got quite a selection - from the left, we've got tin foil, folded into weaveable strips, wire, PVC strands of 'scoubidou', bubblewrap, clingfilm, strips of a plastic tablecloth, and some twisted clingfilm in more complicated stitches, as it worked the best! As I was working this sampler, I had a good idea for a larger one - see my next post for more details.

Wednesday 15 July 2015

Project 9 - First samples, Experimenting with Weave Textures + Making a Loom.

Just a few notes on the samplers that tested different weaving techniques - the only background I have for this is when I was trying out the instructions for making a loom and used a large tapestry embroidery frame to attach the warp threads - sewing each loop of navy wool to the twill tape nailed to either end of the frame. I then took a piece of bamboo cane and made a continous string heddle (credit for the tutorial goes here) for it - as well as a reinforced cardboard shed stick and shuttle, which I covered with clingfilm to reduce the friction (it increased the static electricity though!). This made it easy work, though the fibres occasionally felted together with those of the heddle - if I tried this full weaving method again I'd use a tightly woven cord, perhaps the kind you can find in Roman blinds. Once I'd finished, I was quite happy with the product - but holding it up, realised that it was really quite see-through. In some places the tension was a little uneven, too. So I put it away for a bit, and worried about it. Looking through the folder's instructions, I saw that the way forward was to tighten the whole thing using the suggested fork method. I thought that I had been really very thorough with my (again) cardboard beater, but this worked like a dream. As it was only a trial - and one where the shuttle had run out about halfway through, I decided I would move either side of the shuttle join back out towards the edges of the loom. With a large gap of warp threads exposed in the centre, I thought I would take the opportunity to try a little needleweaving - the only trouble this caused in the end was not showing up on camera!


The second sampler I tried out my makeshift loom on, I made a little easier for myself. I made it much narrower, and stuck to the brief - just a few repeats of each technique until I felt confident I could remember and untilise them. Currently, the biggest problem I have in terms of finish is that I somehow never manage to make the warp threads tight enough, and they bow inwards. However, as an experiment, I think this one went very well indeed. I learnt a good few techniques in a short space of time, and without a large outlay of resources. Roll on the next exercise!

Thursday 2 July 2015

Exercise 4 - Rigid Grid Weaving.

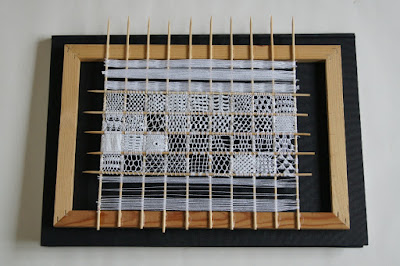
This is the result of me wishing to recreate a sampler I made a few years ago, in which I tried out the many different recommended stitches in a lovely book, the Encyclopedia of Needlework by Th. de Dillmont, of which I have an old copy. Wishing to make the original in the correct way, I put together several layers of felt, and stitched over the top of them a sheet of paper with the grid marked out on it, and then outlined it with some medium-thickness crochet cotton. However, I failed to secure the outlining thread with enough stitches, and as a result, as I filled in the squares with the needlelace stitches, the frame buckled, and warped until there was no tension left. Being very disappointed at wasting so much time,  I left the project alone for more than a year. Reading the brief for this exercise, though, and being interested in the idea of combining weaving and lace - possibly without having to cut the threads of both directions, and weaving more organically shaped windows in the cloth, I decided to resurrect the sampler. Used in real cloth, rather than a frame, I think it would be a little like this one, though I'm pretty certain this used cutwork:
Source here.
Therefore I felt justified in using needlelace - which, quite often, with the needle passing up and down regularly through the fabric - is very similar to needleweaving itself. There are 36 samples of needlelace involved, as well as some experiments with different thread weights at the top and bottom of the frame. The frame itself is made of a pictureframe with wooden skewers glued across. They are not entirely even, and I may well trim their sharp ends! Without listing the stitch used in every part - as they are often given numbers, rather than names, in her book, I found out many interesting things about my favourite subject, lace. I found out that the tougher your border, the better your lacework. In fact, the lace itself is quite tightly pulled up, especially the closely packed stitches made to resemble cloth - I packed them a little too closely myself, and they are slightly popping out the frame. I learned that the fine threads seen in museum examples are both tinier than you would imagine and puzzlingly, a little more possible than you'd think - as long as the needle you're using doesn't have an end sharp enough to damage the threads. I also learned that the amount of concentration needed was high and it was constant. Like painting, there isn't a part of it you can do on autopilot, as the tension of each stitch - and the impact of the current stitch on the last - must always be judged by eye. My only regret regarding this exercise is that I didn't use the experimental materials that I had collected. On the one hand, I feel that I might be missing out on an important learning experience by not trying out the possibilities listed in the folder. On the other, I realise it's quite subjective; it is open - very open - to personal expression and experimentation. And after all, the textiles fields are all very closely linked, and combine so happily.