Friday 28 November 2014

An Extra Project - More Crochet.


Just a quick post on a project I didn't write up earlier in the year. I crocheted a pair of gloves from a 1920s pattern, making my own adjustments for finger length and thumb gusset as I went along. Again, they're made with crochet cotton, and therefore don't stretch well. Thus, the thumb gusset is a little taut when the fingers are outstretched. I made a pair, although as I was photographing them alone, I could only hold out one hand at a time!


Tuesday 25 November 2014

My Appliqué Sampler is Finished.


I'm being a little unorthodox with this project - the folder called for me to collect lots of different scraps of fabric and make a collection of them - I've discussed the new additions to that collection recently in other posts. It rather implied that I should use them to make a collage in appliqué, finding out about the different textures, weaves, and sheens of the fabrics I'd collected whilst constructing a rudimentary shape or picture. I've chosen instead to stick quite rigidly to one kind of fabric, and to exploit the technique of appliqué itself to make an interesting project. What I've got here is a crow, made up of many layers of appliquéd felt. Each layer slightly overlaps the last, and using a fairly thick felt (say 2-3mm), it's possible to build up a 3D shape by trimming or growing the outline of the shape by a few millimetres each layer. Here's a picture of some new feet I've made (a friend saw the crow and wanted one, so I've promised to make another).  


As you can see, the feet (only the feet, legs, and part of the lower body have a wire core) are built around twisted wire. I cut out the rough shape of the feet four times, and pierced a hole in two of them, sliding them down the 'legs' and covering the wire ends. I then attached thread to the top half of the foot and sewed the lower layer of felt to the underside. I then wound the thread from the needle around the toes of the feet until they were securely fastened. I bought the thread back to the beginning and tied it off. To make the legs, I cut lots of small felt disks, and punctured them with a stiletto awl, sometimes widening them with a yarn needle. I then slid those disks down the wire, and made enough (their size increasing in blocks of five or six disks) to build up a fairly sturdy stack. But I realise I haven't talked about my inspiration for this technique. A little while ago, I was stuck for something to draw, and, realising that many of the Renaissance artists I admired drew from natural subjects, especially from 'game birds' and other such unlucky creatures, I bought some animal skulls from eBay. At the same time, I saw that it was possible to buy preserved birds' legs. Accordingly, I bought some of these too. Here's a picture of those legs.


As you can see, they're a rather grizzly prospect, and look unexpectedly vicious. For my crow, I chose not to add to the rather difficult task of making the spindly toes by trying to add shiny satin claws, as I was sure there would soon become a problem with fraying, and as the bird would often 'sit' on it's feet, wrapping wire with embroidery floss wasn't hard-wearing enough. It was a simple enough project to put together, the only problem being that, when cutting out similar shapes repetitively, my right-handedness gave a slight tilt to the bird, which became more pronounced as each layer was added, until the discrepancy became quite noticeable. However, it's still a nice object, with a sweet face, and I'm pleased with it. Having no previous experience of appliqué, it's certainly sped up my hand sewing nicely, and provided a good starting point for creating all kinds of objects that can be built up in layers. Next, for my records, a little gallery of my favourite features.


Here's another angle on the face of the bird. Here you get a better idea of how many layers are included in the head and neck sections.


Another angle on it 'sitting'.


This angle shows off the layers in the body best.


Here's a shot showing the twist in the body, and the direction of the 'feathers'.


The ends of the wings.


Layers in the top of the head.


Slight twist in the beak.


Those legs attached.
I'm pleased with the result of this project, and with the way I looked at the technique for the ideas, thinking 3-dimensionally. This project began as something of an experiment, and I'm only sorry that I don't accordingly have any preparatory sketches. I didn't really think it would work on a full-size creature, and thought it might be an interesting idea for a log post. I hope that my odd approach to the set exercise is acceptable.

Thursday 13 November 2014

Some Extra-Curricular Projects, Part Four, Lacework Base.


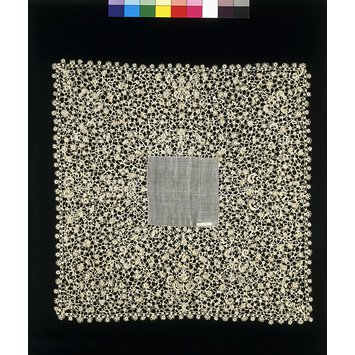
This is probably the project I'm most proud of that I've done outside of 'work' lately. I was inspired by this exquisite piece of Venetian Lacework from the V&A.


Made between 1685 and 1700, it's a perfect representation of the attitude to lace at the time. As much of it as possible, the more intricate the better, and only for the strata of society for whom this is a viable handkerchief. It's obviously a very, very exclusive product. Thinking about needlelace, and how much I want to learn it, I set myself a similar project. This particular handkerchief is 37cm square, according to the museum records, and my guideline sketch is a little larger, about 40-42cm (needless to say, not only is it unlikely that I can find a good, authentic thread of a similar fineness, but I expect my own work to be rather clumsy and flimsy at first, so a very slight scaling-up will, I hope, be excusable). So, I had my inspiration and my scale, but I wasn't too keen on the design. I remembered a piece I had blogged about previously:


The Irish crochet accessory set from the Metropolitan Museum of Art, New York. Though on a much more realistic scale for a handkerchief, this is still a work of art that I'm sure was never used! I love the way the nineteenth-century trend for ferns and the beautiful naturalism of the Irish crochet medium combine to make something so full of the elegance of nature, yet so up-to-date and stylish for an 1850s woman. And that era of design was what I wanted to combine with the needlelace technique of earlier centuries. So, in the full knowledge of the time I would likely need to take for the project (it's long-long-term), I set about being very organised and keeping to the recommended stages for working. First, I drew out my design in pencil on some thick white paper. Then, I traced it, keeping the original paper as a backup/master draft. Next, I looked into some techniques in my book on Alençon lace, and found out about the background that lacemakers used originally. I found that this was most often a green-dyed sheet of vellum. Unable to find a vegetarian alternative closer than card, I bought some sheets of a dark green, as this apparently helps define the thread better, and keep the eyes from becoming strained. Then, I attached the tracing to the green card, and carefully, using a needle in a cork, pricked through the design, piece by piece, covering the tracing with yellow highlighter to ensure I didn't perforate the same area twice (you can see how yellow the draft became in the picture that the top of this post. I then removed the tracing, and was rather dismayed to find that the tracing was almost impossible to follow without constant reference to the tracing. Therefore, I improvised. I took an anglepoise lamp, removed the bulb, unscrewed the hood and surround, replaced the bulb, and laid it on the table, propping the hot bulb up away from the paper. Next I took an old box for Ferrero Rocher, stacked it on top of some glass jars so as to cast fewer shadows, and placed the tracing over the top. Voilà, a temporary lightbox. This way I could move the tracing around and see the precise location of the holes made in the drawing. I could now join them up on my green card, like a huge dot-to-dot puzzle! Once the drawing was complete, I took two sheets of poly-satin backing (knowing that, with their very artificial weave, there would be no impediment to the needle, and that the thread could pass through it at any spot without being distorted by the weave. I isolated my design within a box, and marked out the sides of the box with more perforations, one at each centimetre along. I then carefully stretched and sewed down the card to the two layers of satin. With this stage complete, I could try a trial tracing of the design. For this, I used a spool of special 100/3 sized linen thread for the laid thread, and some size 100 Japanese silk thread for the couching.
As you can see in the photo below, I've outlined part of a fern so far. There are some gaps in the design still, but they are where I am hoping to make thistles. As yet, I'm not sure how I will! Now that I am certain this project can be traced, it may be a good time to practice on a smaller, trial piece, each stage in full, and see whether it stays together when I cut it away from the backing! I've practised before with filling stitches, so I'm fairly confident I will be able to trace and fill the shapes, but as there is such an emphasis on the precise edging of motifs, especially in Alençon work, I shall have to but sure I know what I'm doing before I 'take the plunge'!


Monday 10 November 2014

Some Extra-Curricular Projects, Part Three, Goldwork Sampler


As I've said recently, I'm very interested indeed in medieval embroidery, particularly of a goldwork nature. I had some old yarn (probably about as thick as embroidery floss in it's halved 3-strand state), which featured a gold-metallic effect, and some pale yellow thread. I decided to make a little sampler of goldwork techniques. Therefore, I drew a zigzig/chevron pattern out on some spare linen cloth and practised some underside couching, which I understand was a much-used technique in medieval clothing. It's come out very nicely, though I think next time I will be a little less timid and use ink, rather than pencil, to mark out the points of the chevrons. Perhaps it would be a good idea to get a lamp with a magnifier, and used counted thread embroidery in tandem with this. I'm also going to try painting (probably with watercolours, though I'll need to look into this) a design onto fabric to embroider in Or Nué, which I attempted here in the corner of the photo, by counting the number of dots for different thread colours and making a stitch for each in every row. This soon became very difficult to keep track of, even across a row of maybe twenty stitches. Finding a good system to keep all of the underside threads from tangling when they aren't in use will also be a must.

Wednesday 5 November 2014

Some Extra-Curricular Projects, Part Two, a Makeshift Loom.


Recently I caught a terrific bargain on eBay - some (mostly complete) tapestry frames, about 27" square. At first, I wasn't too sure what to use them for, and bought them because I thought they'd "come in handy". Then I came across a title that interested me at the local second-hand bookshop; the cheesily-covered (a very dated design outside, nicely illustrated within), but genuinely helpful "The Open Canvas" by Carolyn Ambuter. Of course, I'd seen 'openwork' before, but here was a lengthy book on pure technique. I decided these techniques (and there are a good few hundred just in this book) would be a good project. Accordingly I took some of the huge balls of Aran wool that a kind friend recently passed on to me, and began to sew a makeshift loom into the twill tape at either end of the frame. Next I'll need to figure out how to make an extra-wide shuttle to pass the wool through!

Monday 3 November 2014

Some Extra-Curricular Projects, Part One, More Crochet.


Some other projects that haven't been directly set by the folder that I've been doing in my spare time recently include these additions to an 1890s style hat I've been putting together. I've been out and bought some vintage hat pins to attach butterflies to, as seen in the picture above, and made plenty of flowers, insects, and patterned grounds, all of which I'm hoping to make into a viable and fairly sturdy hat. It looks a little ludicrous at the moment, but that's because I'm basing what was in fashion at the time on remaining coloured sources, such as Paris fashion plates, rather than more everyday black and white examples, such as portrait photographs. All the objects seen have been made with no. 100 crochet cotton, plus some no. 20 for padding the Irish-style pieces, and a 0.6mm hook. Most of the objects I've taken from contemporary (or as near as I can manage) pattern and craft books from the Antique Pattern Library, which has been, as ever, a fantastic help. I'll post the finished hat as soon as I can.